We all know it is important to interact with our web visitors and potential clients – if they take the trouble to leave a comment on a blog post it’s a good idea to respond so they know a real person is behind the words. But if there are lots of people in your company, potentially interacting with visitors, you could find that their visits to the website skew the underlying data and don’t present an accurate picture in your Google Analytics report.
So excluding certain IPs is very important, especially if you don’t have many visitors yet, to avoid inaccurate statistics on data such as page views, time spent on site and numbers of returning visitors.
There’s a simple way to block the IP addresses of people and organisations involved in your company so the insights from Google Analytics are more valuable to you. However, note that, particularly for people who may work from home, some dynamic IP addresses cannot be changed.
Here are the simple steps to find and exclude an IP address from Google Analytics:
Find your IP address
Just type “what is my IP” into your browser – yes, it’s really that simple…
At the top of the search results page you will see a box showing “Your public IP address”
It will either be in the form of 4 numbers separated by a dot (full stop) such as:
86.129.136.211 (this is a Version 4 IP address)
Or it might be one of the newer version 6 IP addresses when it will look something like:
24a6:57:c:36cf:0000:5efe:109.205.140.116
Adding an IP Address Filter in Google Analytics
Follow these steps to find where to apply the IP filter:
- Log in to Google Analytics.
- Select the account/website for which you want to exclude certain IPs (you can do this via the dropdown menu in the top left of the screen.
- Now click “Admin” which is at the bottom of the menu on the left hand side of the screen and you will see this:
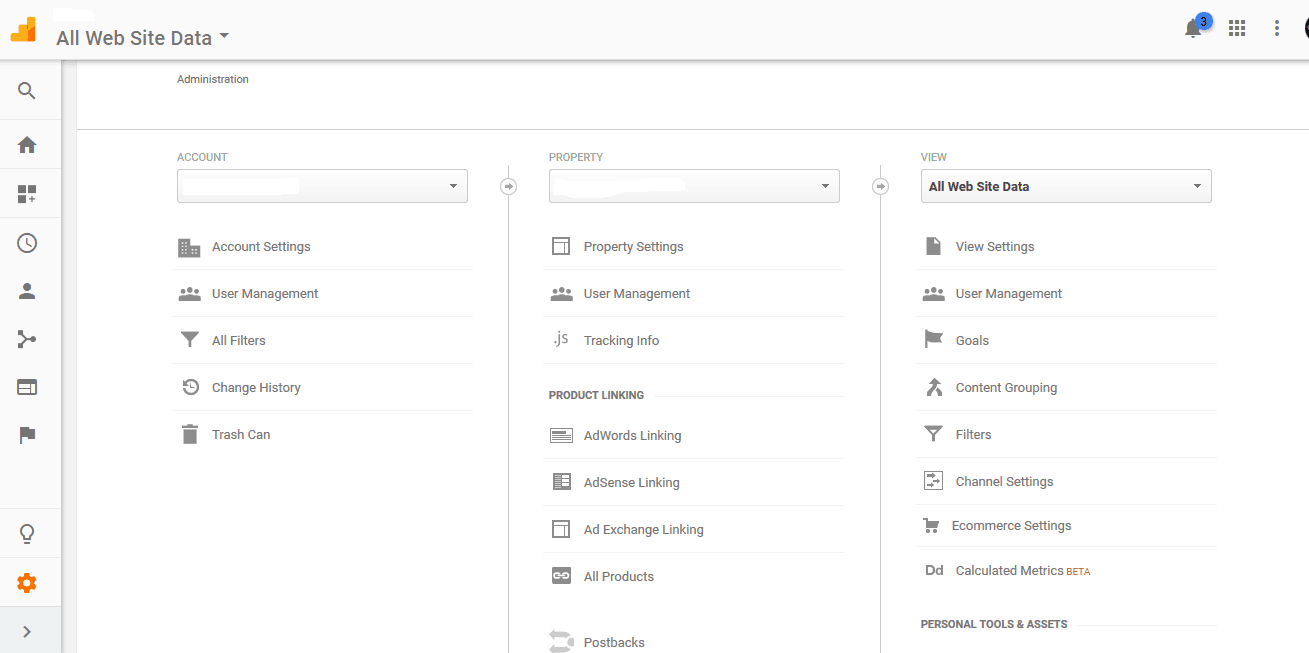
- Under “Account” in the left hand of the 3 columns, click “All Filters”
- Then click the red button to add a new filter.
Adding the filter to exclude IP addresses
- Give your filter a meaningful name so you will know what it is at a later stage, for instance, “Blocked IP Addresses from Company 1”.
- Leave the default filter type setting, which will be “predefined”
- Click on “Select Filter Type” and choose “Exclude”.
- Click on “Select source or destination” and choose “Traffic from the IP addresses”
- Click on “Select expression” and choose “that are equal to”
- Enter your IP address
- Select the view(s) from which you want to exclude the IPs
- Click the Save button
The process will have to be repeated for each IP you wish to block. If you wish to block all people from a certain company then instead of choosing “Traffic from the IP addresses” in step 4 choose “Traffic from the ISP domain” and enter a domain name instead of an IP address.
Jo brings diverse experiences into her role as a Content Specialist, having spent 15 years in logistics before carving a highly successful career as a writer and strategist. Her unique blend of business, law and copywriting expertise allows her to translate complex concepts into engaging and accessible content that resonates with target audiences.